Post by Mastercaster on Mar 7, 2009 20:15:10 GMT -8
This information is dedicated to those who have an interest in learning to make there own resin parts. It should help make you confident in your pursuit of creating some nice parts. I will share what I have learned what to do and what not to do in my personal experiences. I have tried different silicones and resins. I use the same resin that Time Machine resin uses.
Personally, I make all parts from two part molds to keep within the tolerances and look of the original parts. All in the spirit of styrene.
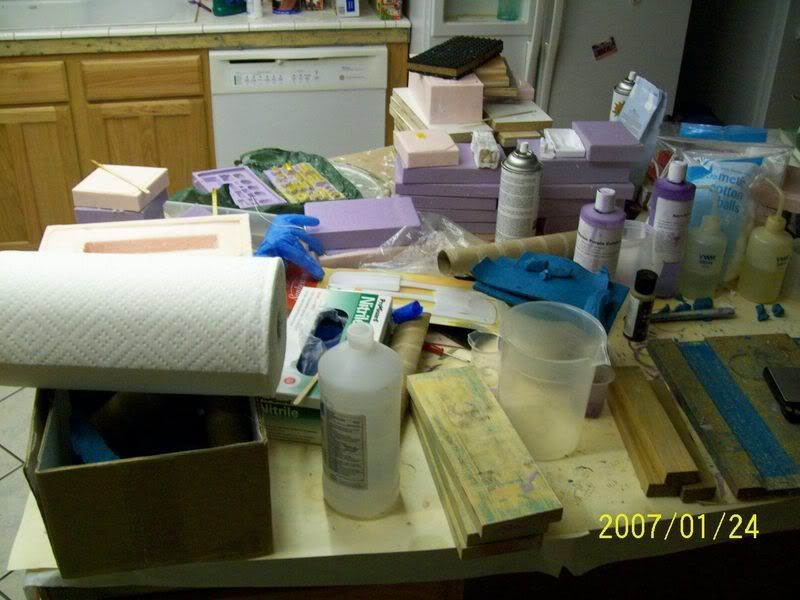
Picture one above starting at left is paper towels on the box holding synthetic clay used for "CLAYING UP" parts. You cannot use a oil base clay because the liquid silicone that touches it will not cure. Behind the towels is a 3 plus pound body mold that I like to use with my SECRET WEAPON! LOL To the right is a bottle of alcohol I use for cleaning leftover liquid resin out of containers after mixing and pouring into a mold and general cleaning. I buy denatured alcohol from Home Depot by the gallon and then work out of this small container. a box of rubber gloves. Some pieces of wood I use to make the mold box to create a mold. A laboratory grade plastic container that have nice pour spouts, This one is graduated to 1000 milliliters, it is 6 inches tall. In the back is a mold with some freshly cast gold transparent parts for the TA ROADSTER project. In the back, on top is a black thing that looks like a cookie!? THAT'S THE SECRET WEAPON!! LOL
  Raoul, this is what will increase your success rate
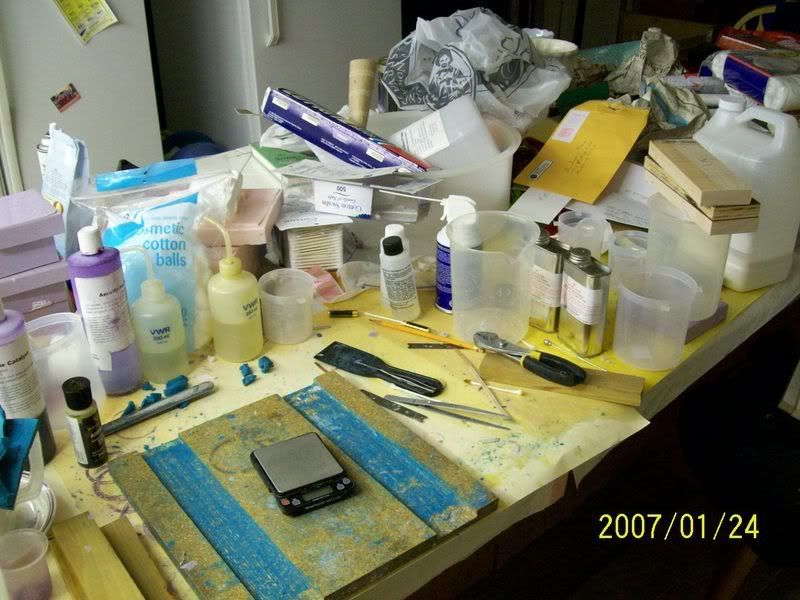
Picture two above is a cheap EBAY gram scale I use to measure liquid material. You will need one that has a "tare" setting, which means that you can turn it on , place a container on it, press "tare", it will zero out and then you will measure the weight of the contents being poured into a container. I use multiple containers of the same size. The one problem I have with this scale is that it sometimes shuts off before I am done weighing. I then have to turn it back on, set a empty like container on it, press tare and then set the partly filled container back on the scale.
You will need to do good accurate weighing and measuring. This is especially important if you are starting with a expensive starter kit. When you get to the bottom of your kit you may not have enough activator to cure the silicone. Be very careful not to spill activator either. Using too much activator is a waste. I worked with a guy who's motto was "If a little does a little good, a lot will do a lot of good" This does not apply here. I here guys say they mix the resin with more of one part than the other to make it hotter. I just don't get this idea at all. Occasionally, I do follow directions though my wife would argue this point. ;D LOL
The board underneath is 12 inches square. I cut grooves with my table saw. Both strips are a little over 2 inches wide. One is 1/4 inch deep, the other is 3/8 inch deep. I heat up clay and press it in the groove to make a nice flat strip to "Clay up" parts on.
There are Cotton balls, Q-tips, a 2 inch wide putty knife that I use to lift the clay out of the groove, tweezers, various containers. A bottle of HOK gold Kandy dye, a sanding stick I use to put a point on coffee stirring sticks to help work with clay. I get them from Star bucks, they are great for mixing resin too. To the right are two metal containers with the clear water resin in them I buy from Alumilite. Pliers to get their caps off.
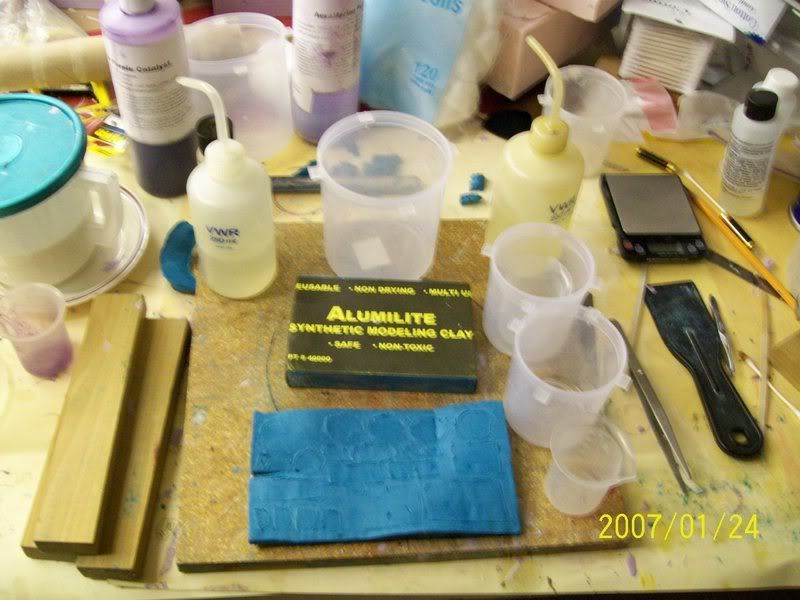
Picture three shows a 1 pound pack of the clay and in front a 4 inch by 7 inch strip of clay 1/4 inch thick, just a little smaller than the SECRET WEAPON! LOL To the far left is a small pitcher with a blue lid, I keep a small amount of the silicone material in that, again, it has a nice pouring spout. I like to pour material into smaller containers out of the factory containers. The two bottles that have the small funny spouts and VWR printed on them are called Laboratory wash down bottles, I keep the two parts of liquid resin in them. They have a small tube in the middle that goes to the bottom. You simply give the bottle a squeeze and liquid will flow out of it. A FUNNY NOTE HERE!! MOTHER NATURE WILL QUIETLY SQUEEZE IT AND MAKE LIQUID COME OUT OF IT TOO! It will act as a barometer. I had to drill a small hole in the lid to stop this. Now I put my finger over the tiny hole and then squeeze it to get resin to come out. The board underneath is the other side of the strips. This is where I place the strip of clay with some parts on it. I box it in with the wood to the left and pour the silicone in it. I can very the size of the mold by doing it this way. Front right is a small 50 milliliter container that I like because it has a nice pour spout. I have several of these. I prefer them to the cheap throw away cups. The only drawback is when I get busy and forget to clean one out after pouring mixed resin in a mold and the leftover material cures in it. Remember that the resin and silicone can be easily cleaned up with alcohol in a liquid state.
I have some extra boards with the grooves cut in them. If you are interested. I might be willing to do some trading. You will get the 12 inch board, four wide pieces of wood and four narrow pieces of wood. The wide ones are for doing most bodies.
NOTE: It is a mystery to me that even though the 300 resin is mixed in equal parts the PART "B" resin seems to disappear out of the bottle faster. Part "A" is the nasty one, it gets crusty and sometimes stops up the tube in the bottle. I add this first in the empty container. I do not want resin starting to cure while I'm messing with equipment malfunctions. Use of containers is up to you.
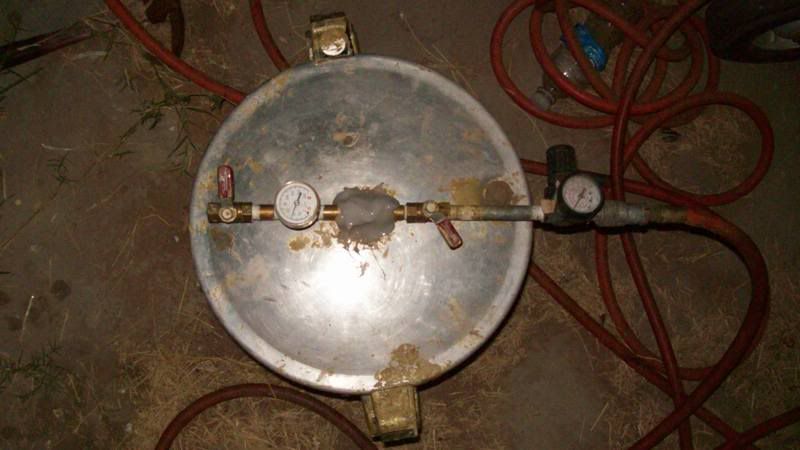
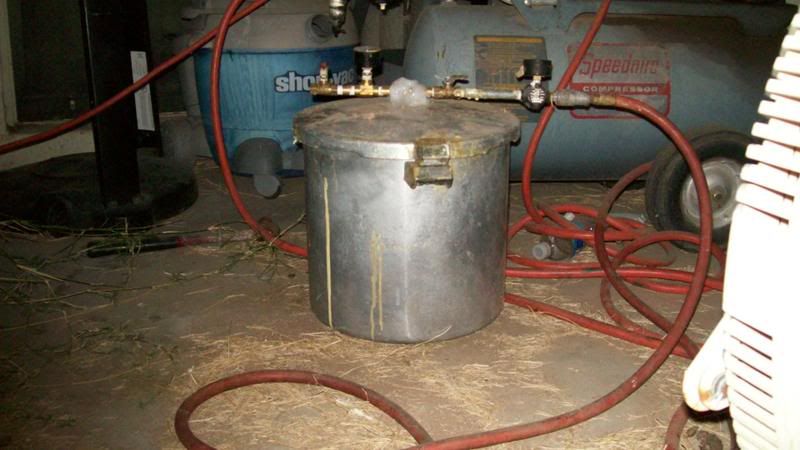
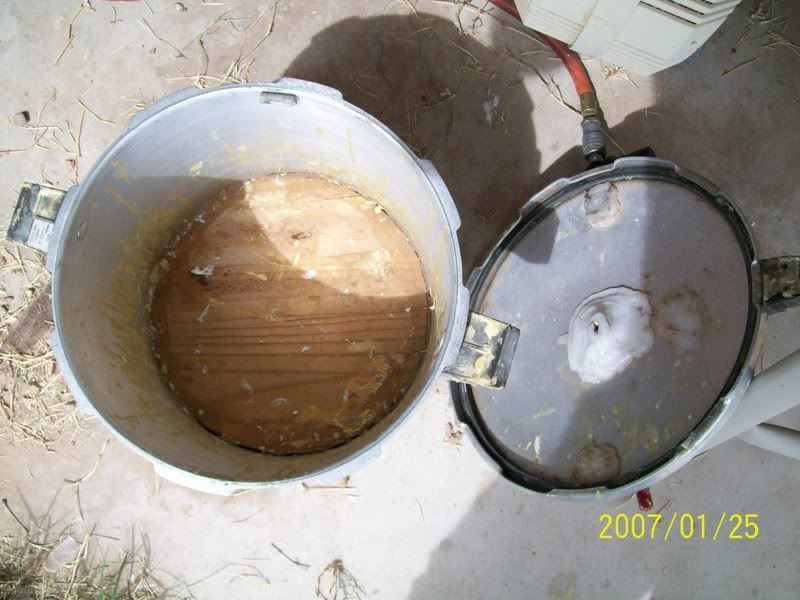
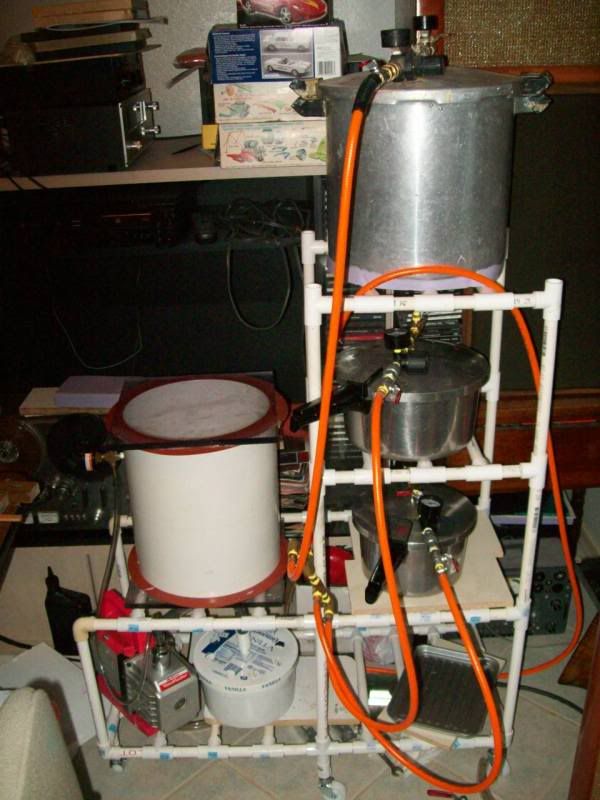
Picture four and five and six are of the pressure pot used for crushing the bubbles in the resin after the liquid resin is poured in a mold, the top of the mold is set and I use the SECRET WEAPON! LOL This is a converted 23 quart pressure canner. I chose this because it has a 12 inch inside diameter. I use about 40 lbs of air. I bought and installed a pressure regulator from Home Depot. There is a 1 inch thick piece of wood in the bottom of it. I had a regulator that I had purchased from Harbor Freight, it was a piece of junk! Once in awhile, it would somehow stick full open. The first time I put pressure on this pot, it stuck full open. Before I could get the valve turned off, it blew the lid off and pushed the bottom out, I was not very happy. I have over a hundred bucks in it. I got it off of Ebay for about 80 bucks plus the parts and time to convert it. Fortunately, it did not ruin it. I had to put a new lid gasket on it after it blew too. Any pressure over 40 PSI is a waste. Too much pressure can actually cause the mold to distort making a crappy part. Also, I use GE silicone II for sealing holes and such, it is the best pure silicone.
www.alumilite.com/ProdDetail.cfm?Category=Equipment&Name=Vacuum%20Chamber
The above is a link to the vacuum chamber that I bought. It was the best deal I could find. The body is a ten inch PVC glued type pipe coupling, you would probably pay around $80.00 just for that part at a plumbing supply house. While you are buying this, buy some clear water resin and about 5 pounds of clay too, you will save on shipping.
If you put Clear water resin in a mold and put the mold in the vacuum chamber, it will suck the resin out of the mold. I only use the vacuum chamber for de airing liquid silicone. Here is another note: The pressure pot will crush bubbles in the liquid silicone too, but it also may take more than 40 PSI. More on this later. I use a ROBINAIR brand of vacuum pump. I think it is a two stage, 5 CFM pump. Local guys note: Andy's Hobby Shop sells alumilite products! He might be able to save you some shipping dough. The one pound silicone containers cost a fortune too.
If you feel like attempting to make your own Vacuum chamber, I have some 12 diameter PVC pipe, it has about a 1/2 inch thick wall. The piece is about 3 feet long. You would only need about a ten inch length. I saved it from the trash as the elevator company was installing a new hydraulic mast on a car in one of the buildings on Campus. I could cut a piece with a sawzall and you would be responsible for cleaning up the ends and scrounging the rest of the parts to build a chamber. We could do some trading for that too.
www.jgreer.com/index.htm
The above link is to the silicone that I started using. It has been so far the cheapest and most successful. Also part of the success is the new way I 'Clay up" parts and use the SECRET WEAPON! LOL
I'm no genius when it comes to business sense, I would have been money ahead to have purchased a 5 gallon kit. The guy does ship fast, I order on a Monday and get it on the Wednesday of the same week. I first found the guy on Ebay, he takes Paypal too. This is a NON tin Silicone. It works well with white resin and clear resin too.
www.smooth-on.com/default.htm
www.timemachineresin.bravehost.com/
I use the 300 white resin from this company. I order from Reynolds in Hollywood Cal. There is a guy here named Glen who is very knowledgeable about resin casting. Except for my SECRET WEAPON! LOL
LOL
Another note: DO NOT EVER PUT A MOLD IN A OVEN TO PREHEAT IT! NEVER, NEVER, NEVER EVER listen to this part of the reps advice!!! Jeff, the Time Machine Resin guy asked "WHY ARE YOU DOING THAT???" ALL THE REP IS DOING IS CAUSING YOU TO BURN UP THE MOLD SO YOU WILL BUY MORE SILICONE!!! You will also end up making better parts, AND.....even better parts if you have........the SECRET WEAPON!! LOL LOL LOL It's 4:20 AM
OK....If you are attempting to make a clear part you will pretty much need to heat the mold. Preheat the mold to about 150 to 180 depending on your ovens minimum temp. Mine is 170.
www.price-driscoll.com/
The above link is to the company I get my mold release from. I use the paintable ULTRA 4. This is another item that the Time Machine resin guy uses. I buy it by the case at about $9.00 a can. They may still have a free can offer.
I spray this on the first part of the mold before pouring the silicone in that creates the other side of the mold. I have forgotten this step. Silicone will stick to silicone. If you forget this and the silicone of mold part two cures. It will not be good. You will have to cut up the mold very gently to remove the parts that will become encased in the silicone. If you remember to do this. Spray mold part one, let set for 30 minutes minimum. Then I take a Q-tip and try to remove what I can to not allow it to cover detail in the part you are making a mold of. You want as much true detail as you can from your original part. After "claying up" parts and before pouring silicone you want to wipe all parts off to remove finger prints and foreign materials. Silicone will pick up a finger print. It will see everything!
Personally, I make all parts from two part molds to keep within the tolerances and look of the original parts. All in the spirit of styrene.

Picture one above starting at left is paper towels on the box holding synthetic clay used for "CLAYING UP" parts. You cannot use a oil base clay because the liquid silicone that touches it will not cure. Behind the towels is a 3 plus pound body mold that I like to use with my SECRET WEAPON! LOL
 To the right is a bottle of alcohol I use for cleaning leftover liquid resin out of containers after mixing and pouring into a mold and general cleaning. I buy denatured alcohol from Home Depot by the gallon and then work out of this small container. a box of rubber gloves. Some pieces of wood I use to make the mold box to create a mold. A laboratory grade plastic container that have nice pour spouts, This one is graduated to 1000 milliliters, it is 6 inches tall. In the back is a mold with some freshly cast gold transparent parts for the TA ROADSTER project. In the back, on top is a black thing that looks like a cookie!? THAT'S THE SECRET WEAPON!! LOL
  Raoul, this is what will increase your success rate

Picture two above is a cheap EBAY gram scale I use to measure liquid material. You will need one that has a "tare" setting, which means that you can turn it on , place a container on it, press "tare", it will zero out and then you will measure the weight of the contents being poured into a container. I use multiple containers of the same size. The one problem I have with this scale is that it sometimes shuts off before I am done weighing. I then have to turn it back on, set a empty like container on it, press tare and then set the partly filled container back on the scale.
You will need to do good accurate weighing and measuring. This is especially important if you are starting with a expensive starter kit. When you get to the bottom of your kit you may not have enough activator to cure the silicone. Be very careful not to spill activator either. Using too much activator is a waste. I worked with a guy who's motto was "If a little does a little good, a lot will do a lot of good" This does not apply here. I here guys say they mix the resin with more of one part than the other to make it hotter. I just don't get this idea at all. Occasionally, I do follow directions though my wife would argue this point. ;D LOL
The board underneath is 12 inches square. I cut grooves with my table saw. Both strips are a little over 2 inches wide. One is 1/4 inch deep, the other is 3/8 inch deep. I heat up clay and press it in the groove to make a nice flat strip to "Clay up" parts on.
There are Cotton balls, Q-tips, a 2 inch wide putty knife that I use to lift the clay out of the groove, tweezers, various containers. A bottle of HOK gold Kandy dye, a sanding stick I use to put a point on coffee stirring sticks to help work with clay. I get them from Star bucks, they are great for mixing resin too. To the right are two metal containers with the clear water resin in them I buy from Alumilite. Pliers to get their caps off.

Picture three shows a 1 pound pack of the clay and in front a 4 inch by 7 inch strip of clay 1/4 inch thick, just a little smaller than the SECRET WEAPON! LOL
 To the far left is a small pitcher with a blue lid, I keep a small amount of the silicone material in that, again, it has a nice pouring spout. I like to pour material into smaller containers out of the factory containers. The two bottles that have the small funny spouts and VWR printed on them are called Laboratory wash down bottles, I keep the two parts of liquid resin in them. They have a small tube in the middle that goes to the bottom. You simply give the bottle a squeeze and liquid will flow out of it. A FUNNY NOTE HERE!! MOTHER NATURE WILL QUIETLY SQUEEZE IT AND MAKE LIQUID COME OUT OF IT TOO! It will act as a barometer. I had to drill a small hole in the lid to stop this. Now I put my finger over the tiny hole and then squeeze it to get resin to come out. The board underneath is the other side of the strips. This is where I place the strip of clay with some parts on it. I box it in with the wood to the left and pour the silicone in it. I can very the size of the mold by doing it this way. Front right is a small 50 milliliter container that I like because it has a nice pour spout. I have several of these. I prefer them to the cheap throw away cups. The only drawback is when I get busy and forget to clean one out after pouring mixed resin in a mold and the leftover material cures in it. Remember that the resin and silicone can be easily cleaned up with alcohol in a liquid state.
I have some extra boards with the grooves cut in them. If you are interested. I might be willing to do some trading. You will get the 12 inch board, four wide pieces of wood and four narrow pieces of wood. The wide ones are for doing most bodies.
NOTE: It is a mystery to me that even though the 300 resin is mixed in equal parts the PART "B" resin seems to disappear out of the bottle faster. Part "A" is the nasty one, it gets crusty and sometimes stops up the tube in the bottle. I add this first in the empty container. I do not want resin starting to cure while I'm messing with equipment malfunctions. Use of containers is up to you.


Picture four and five and six are of the pressure pot used for crushing the bubbles in the resin after the liquid resin is poured in a mold, the top of the mold is set and I use the SECRET WEAPON! LOL
 This is a converted 23 quart pressure canner. I chose this because it has a 12 inch inside diameter. I use about 40 lbs of air. I bought and installed a pressure regulator from Home Depot. There is a 1 inch thick piece of wood in the bottom of it. I had a regulator that I had purchased from Harbor Freight, it was a piece of junk! Once in awhile, it would somehow stick full open. The first time I put pressure on this pot, it stuck full open. Before I could get the valve turned off, it blew the lid off and pushed the bottom out, I was not very happy. I have over a hundred bucks in it. I got it off of Ebay for about 80 bucks plus the parts and time to convert it. Fortunately, it did not ruin it. I had to put a new lid gasket on it after it blew too. Any pressure over 40 PSI is a waste. Too much pressure can actually cause the mold to distort making a crappy part. Also, I use GE silicone II for sealing holes and such, it is the best pure silicone.
www.alumilite.com/ProdDetail.cfm?Category=Equipment&Name=Vacuum%20Chamber
The above is a link to the vacuum chamber that I bought. It was the best deal I could find. The body is a ten inch PVC glued type pipe coupling, you would probably pay around $80.00 just for that part at a plumbing supply house. While you are buying this, buy some clear water resin and about 5 pounds of clay too, you will save on shipping.
If you put Clear water resin in a mold and put the mold in the vacuum chamber, it will suck the resin out of the mold. I only use the vacuum chamber for de airing liquid silicone. Here is another note: The pressure pot will crush bubbles in the liquid silicone too, but it also may take more than 40 PSI. More on this later. I use a ROBINAIR brand of vacuum pump. I think it is a two stage, 5 CFM pump. Local guys note: Andy's Hobby Shop sells alumilite products! He might be able to save you some shipping dough. The one pound silicone containers cost a fortune too.
If you feel like attempting to make your own Vacuum chamber, I have some 12 diameter PVC pipe, it has about a 1/2 inch thick wall. The piece is about 3 feet long. You would only need about a ten inch length. I saved it from the trash as the elevator company was installing a new hydraulic mast on a car in one of the buildings on Campus. I could cut a piece with a sawzall and you would be responsible for cleaning up the ends and scrounging the rest of the parts to build a chamber. We could do some trading for that too.
www.jgreer.com/index.htm
The above link is to the silicone that I started using. It has been so far the cheapest and most successful. Also part of the success is the new way I 'Clay up" parts and use the SECRET WEAPON! LOL

I'm no genius when it comes to business sense, I would have been money ahead to have purchased a 5 gallon kit. The guy does ship fast, I order on a Monday and get it on the Wednesday of the same week. I first found the guy on Ebay, he takes Paypal too. This is a NON tin Silicone. It works well with white resin and clear resin too.
www.smooth-on.com/default.htm
www.timemachineresin.bravehost.com/
I use the 300 white resin from this company. I order from Reynolds in Hollywood Cal. There is a guy here named Glen who is very knowledgeable about resin casting. Except for my SECRET WEAPON!
 LOL
LOLAnother note: DO NOT EVER PUT A MOLD IN A OVEN TO PREHEAT IT! NEVER, NEVER, NEVER EVER listen to this part of the reps advice!!! Jeff, the Time Machine Resin guy asked "WHY ARE YOU DOING THAT???" ALL THE REP IS DOING IS CAUSING YOU TO BURN UP THE MOLD SO YOU WILL BUY MORE SILICONE!!! You will also end up making better parts, AND.....even better parts if you have........the SECRET WEAPON!!
 LOL LOL LOL It's 4:20 AM
OK....If you are attempting to make a clear part you will pretty much need to heat the mold. Preheat the mold to about 150 to 180 depending on your ovens minimum temp. Mine is 170.
www.price-driscoll.com/
The above link is to the company I get my mold release from. I use the paintable ULTRA 4. This is another item that the Time Machine resin guy uses. I buy it by the case at about $9.00 a can. They may still have a free can offer.
I spray this on the first part of the mold before pouring the silicone in that creates the other side of the mold. I have forgotten this step. Silicone will stick to silicone. If you forget this and the silicone of mold part two cures. It will not be good. You will have to cut up the mold very gently to remove the parts that will become encased in the silicone. If you remember to do this. Spray mold part one, let set for 30 minutes minimum. Then I take a Q-tip and try to remove what I can to not allow it to cover detail in the part you are making a mold of. You want as much true detail as you can from your original part. After "claying up" parts and before pouring silicone you want to wipe all parts off to remove finger prints and foreign materials. Silicone will pick up a finger print. It will see everything!


