Post by Mastercaster on Jul 26, 2011 2:32:47 GMT -8
Thanks to Dave for allowing me this space for another HOW TO that does not have anything to do with model building. Plumbing is what I do for a living and installing the pipe insulation was part of that job when I worked at Purdue University. Insulation just does not get a hell of a lot respect for what it is and what it does.
I recommend this product over the gray firmer foam insulation that you get from most big box stores. I think Home Depot does carry this brand but it might only be 3/8 thick wall, but I might be wrong! I would go with 1/2 thick minimum. They typically sell a pre split tube with a peel and stick strip and this is OK for straight runs. This Armaflex product is a great product but very delicate too. People buy pipe insulation but are not properly taught how to put it on a pipe. It should not be shoved around the elbow like I have seen so many do and this is what I was shown how to do by guys I worked with but they were not really trained either.
This is the most important part of most any piping installation. Why do we insulate piping systems?
1. Condensation control. Pipes can sweat and cause the outside area of the pipe to become wet. Everything around this sweating pipe can be wet too, causing water damage and mold to grow. Mold is not good! Bugs can also be attracted to this moisture, also not good.
2. Temperature retention. Keeps the piping system hot or cold whether it be a domestic cold water, chilled water, domestic hot water or a steam line.
3. sound barrier. Drain lines can be quieted by insulating them. Drains can also sweat too. That too can cause structural damage, mold and can attract bugs.
armacell.com/
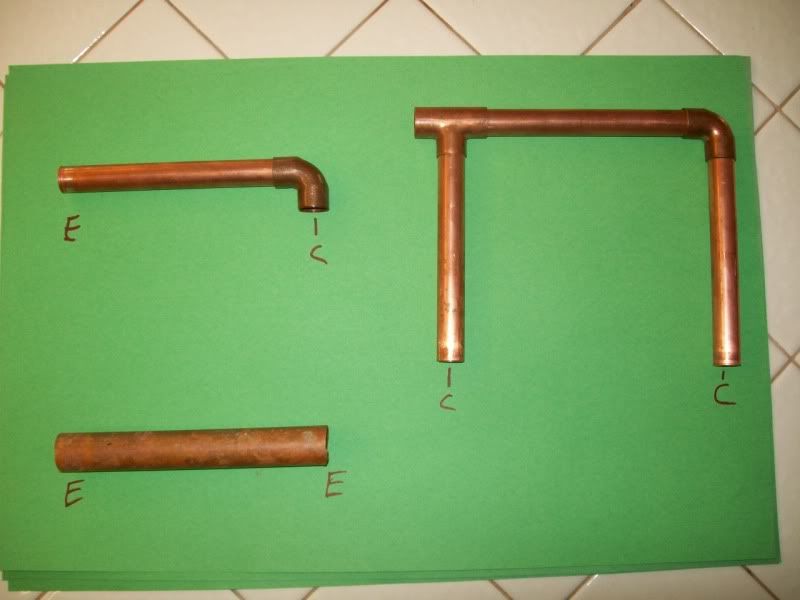
Here are some important ways to take measurements when installing the insulation. End to center, center to center and end to end. This may seem weird but putting insulation on a pipe is not some whack and slap quicky production. This is the final finish of a piping job. This is what could be in the public eye. Poorly installed insulation can look really bad. And with a paint job will look even worse! Just like a glue bomb model.
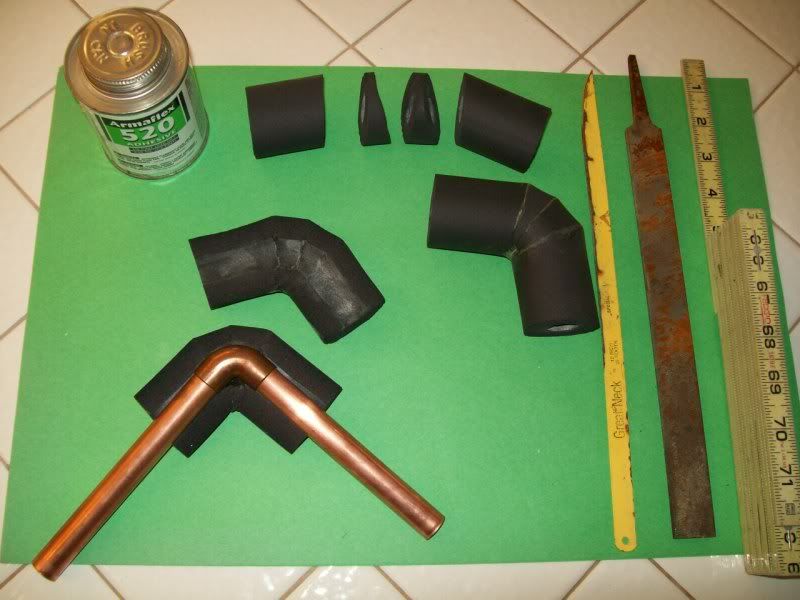
Here is how I make elbows. Tools are pretty simple. I take a hacksaw blade and grind it down on the back side to a point on the end. The rougher the blade the better it cuts. This stuff will dull a sharp blade pretty quickly. A file to rough up the blade edge and a folding ruler to measure with. Also use the fancy circle maker seen in the tee pick The Armacell site shows them cut from two pieces but I think they are really ugly so I make them out of four pieces. If you make them out of two pieces and you do not get the angle right they will look kind of bad once installed. If you don't have all the angles right with a four piece you will have a little wriggle room and it won't look quite as bad. Cutting and gluing angles insures that the insulation will remain 1/2 inch thick around the surface of the entire elbow. If you push this stuff around a elbow fitting the outside part of the elbow will be stretched and the inside part of the elbow will be pinched down not giving the 1/2 inch thickness that should be there.
This is a great product but as I have mentioned it is a delicate product. If you set something on it which seems to happen on a construction site it will be permanently squished down. When this happens it becomes useless. So many times I have seen communications people take cables and wire ties and pull the tie tight ruining the insulation. As you can see the ones I made here are not a perfect right angle but it is pretty darn good free hand for not having done this for quite some time. It is about a 30 to 33 degree cut or so I am guessing. Also pushing this stuff around a fitting can tear the skin inside that is important to it's ability to be very efficient. This product comes in a vast array of diameters and wall thicknesses and sheets too.
local.yahoo.com/info-20005926-pacific-insulation-company-phoenix
Here is a link to the local business that can provide you with this product. I have gone there and paid cash without any problems. Some places may not sell to you if you are not a contractor.
www.mcmaster.com/#glue-guns/=dcdh67
www.mcmaster.com/#glue-guns/=18lfr5t
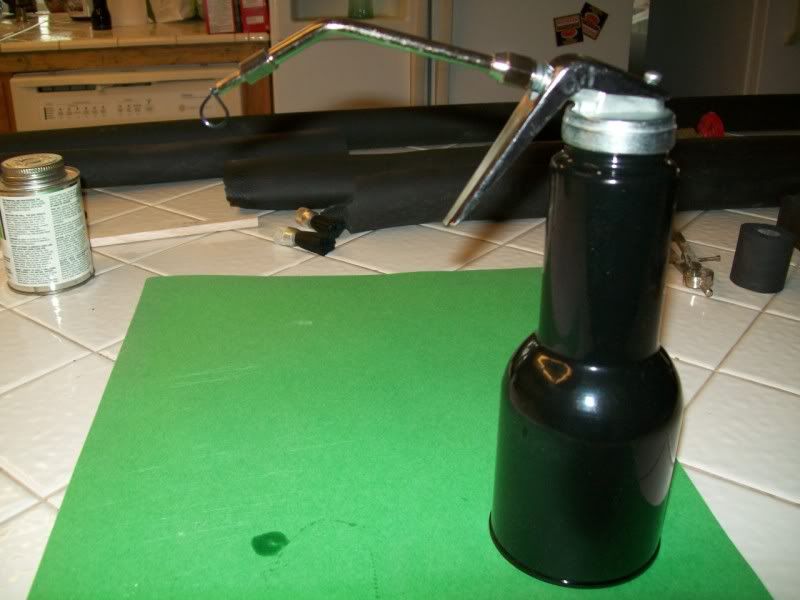
Here is a glue gun that makes the job faster, safer and neater than the glue can with the brush in the lid. Caring for the brush is pretty easy too. Find a plastic jar that is big enough to get your hand in to get the brush out that has a screw on lid. Spray enough WD40 in to cover the brush. Once you have finished with the brush for the day just drop the brush in this bottle and plug off the glue gun tip for the night. You can pull out the brush and take the knife and drag it through the bristles to clean out the clump of glue. Then take the brush and put it back on the gun and pump fresh glue through it using a rag to clean it out and you are ready to start using it again. The brush will last a good while. You might want to keep and have one for a back up.
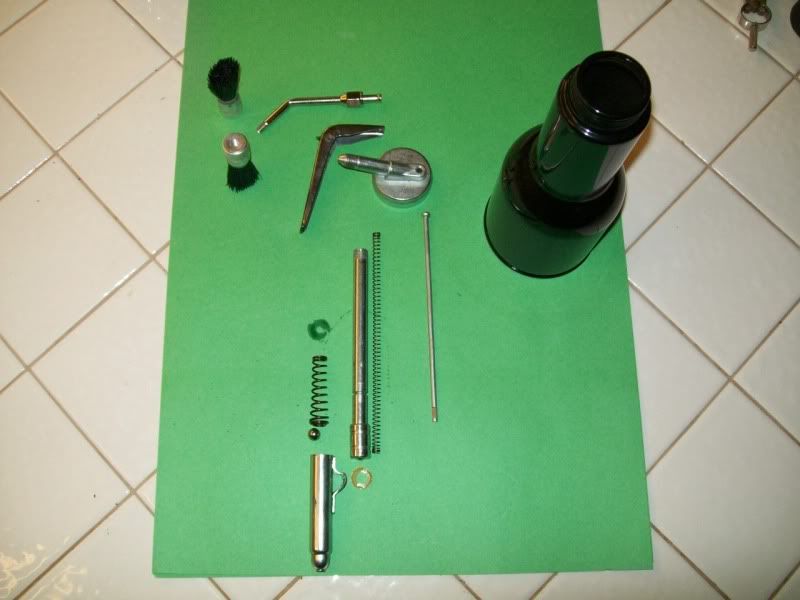
Here is a pic of it taken apart and a pic of the brush. The brushes they sell are very nice. I have seen some pretty crappy ones.
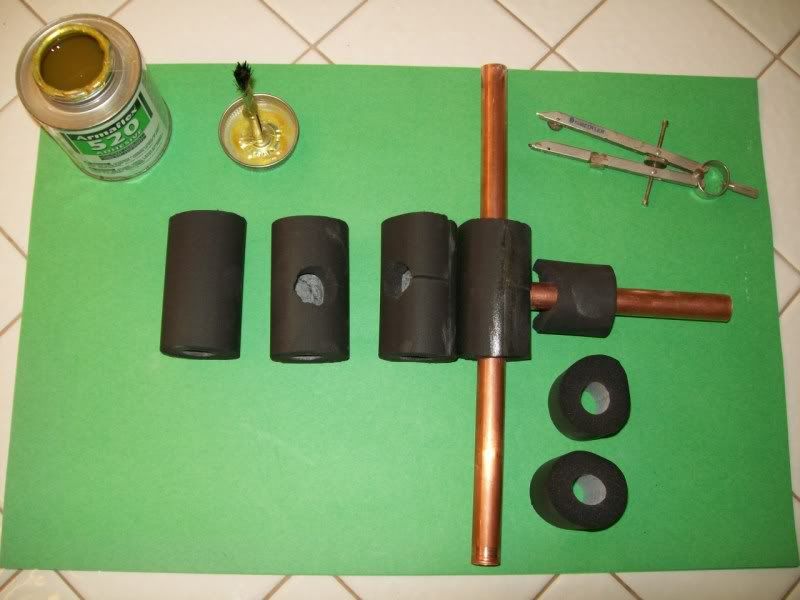
Here is a tee. Cut the hole in, wrap it around the tee. Cut a fish mouth on the intersecting part and glue it together.
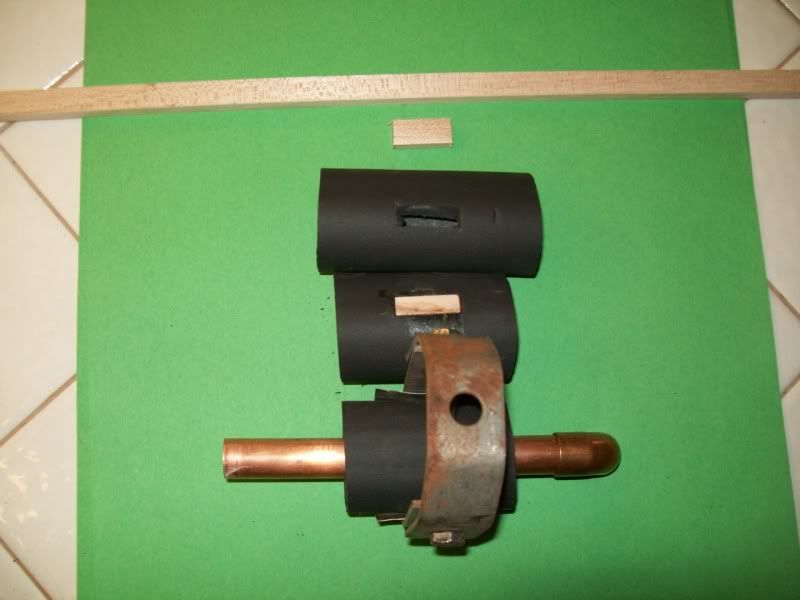
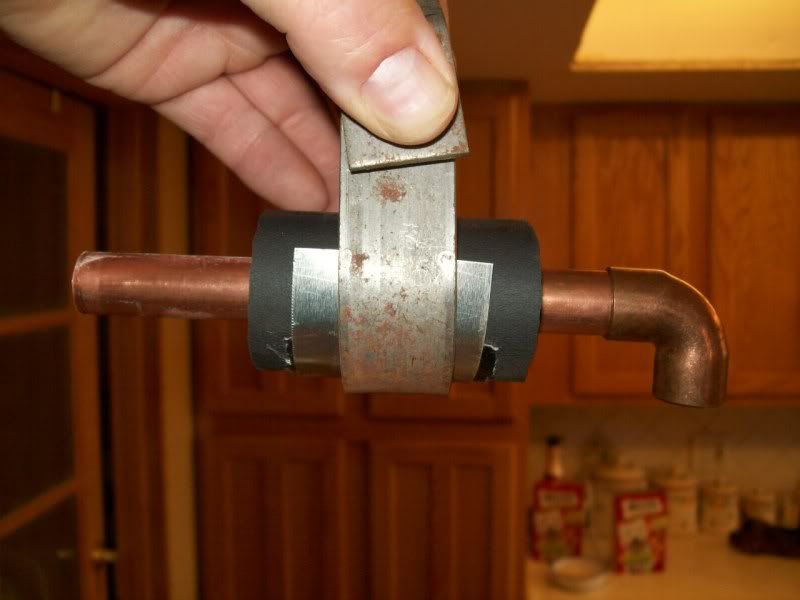
Pipe insulation must be supported from within. Here is a couple of pics of a block of wood that is the same thickness . A good hardwood will last a long time and not conduct thermal temps well. I cut a hole out of the insulation and glued in the block of wood. then I put a piece of duct tape over the outside of the hole to insure a good seal. You can cut a piece of metal called a saddle to support the exterior of the pipe. You can cut up that 22nd beer can out of that case you just consumed for this use! Just don't cut your fingers off because you are too wasted from drinking!
Once you have sobered up you can get real fancy and wrap the insulation with muslin cloth covered in a thin layer of wall paper paste and once dried you can paint it blue for domestic cold water and red for domestic hot water.
The whole job is pretty easy. If you are plumbing a brand new house be sure to leave enough room between your pipes and make holes through floors 2 inches bigger than the pipe you are running through it. Do not cut a one inch hole for the pipe and then butt the insulation to the surface of anything and try to glue. Insulation should be installed just like the pipe itself as much as possible.
I recommend this product over the gray firmer foam insulation that you get from most big box stores. I think Home Depot does carry this brand but it might only be 3/8 thick wall, but I might be wrong! I would go with 1/2 thick minimum. They typically sell a pre split tube with a peel and stick strip and this is OK for straight runs. This Armaflex product is a great product but very delicate too. People buy pipe insulation but are not properly taught how to put it on a pipe. It should not be shoved around the elbow like I have seen so many do and this is what I was shown how to do by guys I worked with but they were not really trained either.
This is the most important part of most any piping installation. Why do we insulate piping systems?
1. Condensation control. Pipes can sweat and cause the outside area of the pipe to become wet. Everything around this sweating pipe can be wet too, causing water damage and mold to grow. Mold is not good! Bugs can also be attracted to this moisture, also not good.
2. Temperature retention. Keeps the piping system hot or cold whether it be a domestic cold water, chilled water, domestic hot water or a steam line.
3. sound barrier. Drain lines can be quieted by insulating them. Drains can also sweat too. That too can cause structural damage, mold and can attract bugs.
armacell.com/

Here are some important ways to take measurements when installing the insulation. End to center, center to center and end to end. This may seem weird but putting insulation on a pipe is not some whack and slap quicky production. This is the final finish of a piping job. This is what could be in the public eye. Poorly installed insulation can look really bad. And with a paint job will look even worse! Just like a glue bomb model.

Here is how I make elbows. Tools are pretty simple. I take a hacksaw blade and grind it down on the back side to a point on the end. The rougher the blade the better it cuts. This stuff will dull a sharp blade pretty quickly. A file to rough up the blade edge and a folding ruler to measure with. Also use the fancy circle maker seen in the tee pick The Armacell site shows them cut from two pieces but I think they are really ugly so I make them out of four pieces. If you make them out of two pieces and you do not get the angle right they will look kind of bad once installed. If you don't have all the angles right with a four piece you will have a little wriggle room and it won't look quite as bad. Cutting and gluing angles insures that the insulation will remain 1/2 inch thick around the surface of the entire elbow. If you push this stuff around a elbow fitting the outside part of the elbow will be stretched and the inside part of the elbow will be pinched down not giving the 1/2 inch thickness that should be there.
This is a great product but as I have mentioned it is a delicate product. If you set something on it which seems to happen on a construction site it will be permanently squished down. When this happens it becomes useless. So many times I have seen communications people take cables and wire ties and pull the tie tight ruining the insulation. As you can see the ones I made here are not a perfect right angle but it is pretty darn good free hand for not having done this for quite some time. It is about a 30 to 33 degree cut or so I am guessing. Also pushing this stuff around a fitting can tear the skin inside that is important to it's ability to be very efficient. This product comes in a vast array of diameters and wall thicknesses and sheets too.
local.yahoo.com/info-20005926-pacific-insulation-company-phoenix
Here is a link to the local business that can provide you with this product. I have gone there and paid cash without any problems. Some places may not sell to you if you are not a contractor.

www.mcmaster.com/#glue-guns/=dcdh67
www.mcmaster.com/#glue-guns/=18lfr5t
Here is a glue gun that makes the job faster, safer and neater than the glue can with the brush in the lid. Caring for the brush is pretty easy too. Find a plastic jar that is big enough to get your hand in to get the brush out that has a screw on lid. Spray enough WD40 in to cover the brush. Once you have finished with the brush for the day just drop the brush in this bottle and plug off the glue gun tip for the night. You can pull out the brush and take the knife and drag it through the bristles to clean out the clump of glue. Then take the brush and put it back on the gun and pump fresh glue through it using a rag to clean it out and you are ready to start using it again. The brush will last a good while. You might want to keep and have one for a back up.

Here is a pic of it taken apart and a pic of the brush. The brushes they sell are very nice. I have seen some pretty crappy ones.

Here is a tee. Cut the hole in, wrap it around the tee. Cut a fish mouth on the intersecting part and glue it together.


Pipe insulation must be supported from within. Here is a couple of pics of a block of wood that is the same thickness . A good hardwood will last a long time and not conduct thermal temps well. I cut a hole out of the insulation and glued in the block of wood. then I put a piece of duct tape over the outside of the hole to insure a good seal. You can cut a piece of metal called a saddle to support the exterior of the pipe. You can cut up that 22nd beer can out of that case you just consumed for this use! Just don't cut your fingers off because you are too wasted from drinking!

Once you have sobered up you can get real fancy and wrap the insulation with muslin cloth covered in a thin layer of wall paper paste and once dried you can paint it blue for domestic cold water and red for domestic hot water.
The whole job is pretty easy. If you are plumbing a brand new house be sure to leave enough room between your pipes and make holes through floors 2 inches bigger than the pipe you are running through it. Do not cut a one inch hole for the pipe and then butt the insulation to the surface of anything and try to glue. Insulation should be installed just like the pipe itself as much as possible.

